How to Cast a Geomancy Shield Chart (A Step-by-Step Guide)
To use Geomancy for divination it is usually required to cast a geomancy Shield Chart. This geomantic chart is a structured layout of sixteen geomantic figures; part randomly generated, and part calculated. The sixteen figures are separated into four mothers, four daughters, four nieces, two witnesses, one judge and one ‘super judge’ (sometimes called the reconciler or sentence). The Shield Chart is so named because the sixteen figures are arranged in the shape of a shield. Each placement acts like an astrological ‘house’ in governing part of the querent’s life and their question.
To cast a geomancy chart, you must focus on the question posed whilst generating 16 figures. The first four are cast by a random means (e.g. making dots on paper, using dice or otherwise), and the remaining 12 are generated from these first figures. Once the chart is complete, a geomancer can then interpret the figures in their positions to give a clear, considered answer to their question.
Here I provide a step-by-step guide in how to build the geomancy shield chart.
Beginners: What You Need
To cast the traditional shield chart, you need only a few basic items. In this step-by-step guide, we’ll be using the dot method for creating a geomancy chart. This is one of my favourite things about geomancy – it makes it a very useful divination tool when you are out and about, away from home and other possessions. You will need:
Plain paper or a notebook – I prefer to have a notebook solely reserved for geomancy divination.
A pen or pencil that writes smoothly and clearly. An ink pen is preferable, or even a felt-tip pen, for it’s ability to make a mark at the slightest touch. Avoid biros!
A clear, specific question you can phrase in one sentence.
Optional:
A Timer – sometimes time can fly by quite quickly when you’re ‘in the zone’ doing divination.
Ritual Items you would normally use. This may include incense, candles, or even an altar cloth.
Whilst I wont cover it here, you can use anything that will provide you a random binary answer. Many geomancy practitioners, myself included, like to add a simple ritual before starting any divination.
Preparing to Cast: You and Your Space
I have read many lists of rules and instructions that a geomancer needs to conduct before casting a chart. Whilst many of these may be putaside, they all underline the need to see divination as an important and sacred act. I advise students to create their own way to prepare before divination (no matter the system!). A few suggestions:
- Cleaning the area. I can already here my Mother, “cleanliness is next to godliness” she’d say. Though there is something to having a clear workspace – both physically and spiritually. Consider cleaning your space, and perhaps cleansing it with incense smoke or a special wash.
- Mark the moment as special. Perhaps you want to light a candle, or perform a short ceremony. Perhaps you want to say a prayer or invocation to a higher power.
- Center yourself. A few deep breaths can help us get ‘into the zone’. Take a moment to just breathe, putting aside any preconceptions or mundane thoughts.
- Reflect on the question. Consider how you want to word it, think about what the question means and the different facets of what you’re asking about. When you’re ready, try to word the question as best you can – even writing it at the top of your paper when you have it.
I find that taking a little bit of time before starting divination often leads to better results. So pause, and make this moment special in whatever way you wish to.
Step-by-Step Casting Instructions
Geomancy uses a fixed order to build the sixteen figures of the shield chart. In turn, we will be working through casting the mothers, creating the daughters, calculating the nieces, witnesses and judge. Finally we will create the sixteenth figure, the Super Judge.
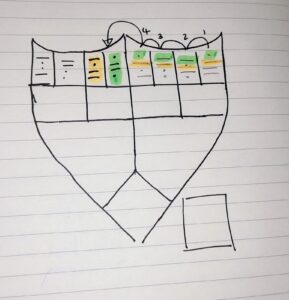
To start, draw on your paper the image of the shield chart below (excluding the numbers):
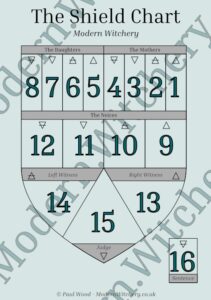
The numbers are the order in which you will write the figures down as they are created. Sometimes each of these places is called a geomantic ‘house’, and are numbered like the picture from one to sixteen. Each ‘house’ represents a specific area of the querent and their question.
You’ll notice that they’re numbered from right to left, which is the way we’ll be working. This is because Geomancy is an Arabic divinatory art, just as Arabic is written from right to left, so too is the shield chart.
You’ll now need to get another blank sheet of paper to begin the process of casting the first four figures of the chart, called the Mothers.
Step 1: Casting the Mothers
The first four figures of the chart, called Mothers, are the foundation of the entire chart. These are the only figures in the chart which are ‘cast’ by you in this process, so they’re pretty special. As you cast these figures, hold the question in your mind gently.
Now, I want you to put the numbers 1 to 16 down the right side of your paper. This is optional, but you’ll thank me later:
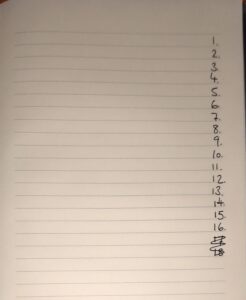
(And yes… I got a little carried away and put too many numbers! Just 16 needed!)
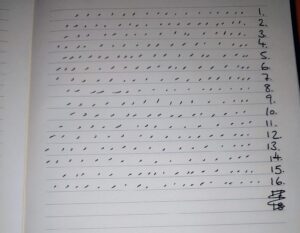
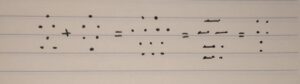
When done, your next job is to make 16 horizontal lines of dots on this piece of paper. These have to be random in number, and it’s best if you ensure that each line is a good number of dots. You want to let yourself lose during this. Ensure you’re not tapping the paper in a rhythm, nor counting the dots, but just let your mind wander away from the task in hand. I like to imagine that I’m sowing seeds in a field’s furrow.
When you have completed it, it will look like this:
Before we progress, a few words of advice:
- It is very easy to not see a dot if it has been made too lightly. This is why I suggested a good pen, but it is also why I suggest that instead of making little dots you make little upward or downward lines. You’ll see this in my example above. They’re easier to count, and there’s nothing mystical about squinting at a page thinking “is that a dot, or just the light?”.
- The numbers 1 to 16 help you know how many lines you have done and still need to do. It means that you can just stay zoned out, making little marks on the white page without needing to consciously think “have I done enough yet?”.
- It will take some a little time to get used to making marks without counting, or without doing it rhythmically. Watch yourself if you start doing the “5, 6, 7, 8!” part way through, otherwise your lines will always be even.
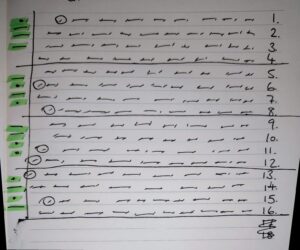
Now that you have your sixteen lines of dots, you need to count each line to see if the total is odd or even. You can do this easily by drawing a line connecting ‘pairs’ of dots and seeing if you end up with one spare or not. If you have ended up with one spare, then it’s an odd line. If you’re left with nothing, then it’s an even line:

Each figure of geomancy is made up of four lines. Each of these lines is either odd (shown as a single dot) or even (shown as a double dot). With this in mind, you can see that the sixteen lines we’ve made represent four lines for four figures (4×4=16). So the first four lines are the first mother figure, the second four lines are the second mother figure, and so on. The below might make it easier to see this in action. I’ve created lines between the sets of four rows, and I’ve highlighted the resultant figure in green on the lefthand side (the end of the row):
You can now add your first four figures (the mothers) onto your shield chart. We now move onto the Daughter figures.
Step 2: Create the Daughters: Transposition
The next four figures are called the Daughter figures. Just like the name implies, the daughters are created by the four mothers. Each daughter is created by transposing the lines of the mothers in the following way:
- Daughter 1: To create this figure, take the top line (fire or head line) from each of the four mothers in turn. So the head of the first mother becomes the top line of the daughter, the head of the second mother becomes the second line of the daughter, the head of the third mother becomes the third line of the daughter, and the head of the fourth mother becomes the fourth line of the daughter. As such you could say that the first daughter is constructed from pure ‘fire’.
- Daughter 2: For the second daughter, you do exactly the same as above but take the second lines (air or neck lines) of the mothers to form it.
- Daughter 3: For the third daughter, once again you take the third lines (water or body lines) from the four mothers to create it.
- Daughter 4: For the last daughter, you use all the fourth lines (earth or feet lines) from each of the mothers.
Here’s an example to illustrate:
I’ve used green highlighting to show you how the tops of each line form the first daughter. I’ve also used yellow (yeah, not so clear but the only colour I had on me!) to show you the same for the neck lines forming the second daughter.
When these are created, add them into your shield which then completes the top line of your chart. That’s eight figures, and you’re half way through! Well done!
Step 3: Create the Nieces: Geomantic Addition
The rest of the chart is created by Geomantic Addition. You can read a full article on geomantic addition on my website, but here I’ll keep it easy to understand and short.
Each niece is created by taking the two figures that sit above it and adding them together to create it;
- The First Niece is created by adding the 1st and 2nd Mother together.
- The Second Niece is created by adding the 3rd and 4th Mother together.
- The Third Niece is created by adding the 1st and 2nd Daughter together.
- The Fourth Niece is created by adding the 3rd and 4th Daughter together.
To add two figures together, you’ll combine them line by line adding the dots of the first with the dots of the second. This will result in either an even or odd result – exactly like when you were counting the dots you made on a piece of paper. This is the same as saying:
- One point plus one point = two points (even).
- Two points plus two points = two points (even).
- One point plus two points (or two plus one) = one point (odd).
Here’s an example to help illustrate:
Here I’m adding Amissio with the figure Carcer (because it contains all the possibilities!). You can see that this is actually exactly the same as how you paired up the dots for the mothers.
Step 4: Calculate the Witnesses and the Judge: The Court
With the nieces completed, the next three figures are called ‘the court’ and represent the core judgement or answer of the chart. They are calculated exactly the same as the nieces, through geomantic addition of the two figures that sit over them:
- Right Witness = Niece 1 + Niece 2.
- Left Witness = Niece 3 + Niece 4.
- Judge = Right Witness + Left Witness.
Whilst some end the casting at this point and move onto the interpretation, most add an additional sixteenth figure called the super judge. In my opinion, this figure isn’t optional and should always be added onto the shield chart. To omit it would be a mistake.
Step 5: The Super Judge or Reconciler.
The Sixteenth figure is the Super Judge.
You create this figure by adding together the first and last figure of the chart – that is the 1st Mother and the Judge.
This additional figure can describe how the situation may evolve beyond the immediate judgement, to clarify the ruling on an unclear judge, or as a summary of the full chart.
Congratulations! You’ve completed the full geomancy shield chart with all sixteen figures! All that remains is to check the validity of the chart, and then interpret it.
Here’s what the final chart should look like:

[I’ll be honest, I’ve purposely made this chart look like a pretty shield. Normally my charts don’t have any of the external lines, just the ones separating the figures… so don’t feel bad if your chart is lopsided, or not quite ‘right’ – as long as you’ve followed the steps and you have the figures in the right places, your chart is just as good!]
Step 6: Check the Validity of the Chart
When you’ve completed the chart, it’s pretty standard that you check you’ve drawn it correctly. It’s very easy to make a mistake when drawing up a geomantic chart, so checking that you’ve done it correctly now – before the interpretation – will save some heartbreak later. If you’ve made a mistake, then any interpretation from the chart is likely to also be false.
Beyond looking at the chart line by line, due to the mathematical process taken in generating a chart, the chart has some underlying rules which can be checked to ensure the chart is correctly drawn:
- The Judge is an even figure. If you add all the points on the judge up, you will get an even number. This is the same as saying the judge has to be one of the following: Amissio, Acquisitio, Via, Conjunctio, Populus, Carcer, Fortuna Major, & Fortuna Minor.
- If you look at both witnesses they will either be both odd, or both even. You will not get a chart where one witness is odd, and the other is even.
- [For More, await my future post]
Step 7: Interpret the Chart
Geomancy chart interpretation is a fine art and definitely not something that’s easy to summarise in a beginners guide. However, here’s a few ways to get a simple answer from your freshly drawn chart:
- Look at the figure in House 1 (1st Mother). The figure in this place represents the querent (the person asking the question) themselves. From this figure you’ll get an understanding of who is asking the question: their health, their disposition, temperament and attitude. Look up the meaning of the figure here. A favourable figure here suggests the querent is well placed to handle the situation, while difficult figures can warn of low energy, confusion, self sabotage, or an unsuitable mindset for clear divination.
- Look at the Right Witness (the first one that was drawn). This represents the querent’s side of the situation or question – imagine this figure as their lawyer representing them at court in front of a judge. The lawyer is going to put forward their viewpoint in an argument, a summary of their past where relevant to the question, and strengths and weaknesses of the querent in respect to the question.
- Look at the Left Witness. This represents the ‘other side’, whatever was asked about in the question. Sometimes this may represent the other person in a situation, otherwise it’s the quesited (desired) thing, the environment or what opposes the querent.
- Look at the Judge. This is the ‘result’, the final ruling on the case at hand. What does the figure mean? Is it a figure in favour or not in favour of what the querent is asking about? Note that all the figures in geomancy are either favourable or unfavourable in certain situations, but they’re context dependant. For instance – Amissio as a judge is unfavourable for things you want to ‘get’, because it’s literal meaning is ‘loss’. So if you have asked about getting money that is owed, the answer is that the money is ‘lost’ to you and is therefore unfavourable. However, if the question was about a friend’s sickness and you received Amissio, then the result is favourable for the sickness ‘leaving’ your friend. So look to the meaning of the figure, and apply it to the situation of your question.
- Finally, look at the super judge. In most cases you can read this as ‘what happens next’. Why is this important? Well, just because you got the judgement you wanted, doesn’t necessarily mean you’ll be happy. Say you have asked about getting a promotion at work, and you read the judge and it says ‘yes, you’ll get the promotion’, you might want to stop there… but the super judge is negative. The super judge might be saying ‘yes, you’ll get the promotion, but you’ll soon find out that you’ll hate the new responsibilities in your job role and will ultimately be unhappy’. This is why this is an important part of the reading, and not an optional figure.
This isn’t exhaustive. I’ve provided this to get you started, but reading a geomancy chart is a beautiful art. The basics make the process seem very formulaic, devoid of intuition, but as you move beyond the basic interpretative methods you’ll start seeing how flexible, intuitive and creative the system is.
Frequently Asked Questions
Digital Alternatives: Can I use a computer to draw a geomancy chart?
Should you choose to, there are digital alternatives (online and apps) which automate some, or all, of the process of drawing a chart. Before I list a few, let me proceed on why you should persevere in manually drawing a chart from scratch.
On every course on Geomancy I’ve taught, I’ve been asked whether there’s a digital alternative to casting a chart. Yet, on every course I’ve ever taught on Tarot, I’ve never been asked if there’s an app which will draw cards for people. Why the difference? Because a geomancy chart takes a while to create whilst drawing a card is instant gratification.
The slow nature of casting a geomancy chart is actually one of the reasons why I suggest you do it, and don’t ‘skip’ to the interpretation stage by using an app. Geomancy is slow, it’s reflective, and it allows ample time for someone reading to enter into the right mindset to examine a chart. The process of setting dots down on a piece of paper is an invitation for mindfulness and meditation amidst the busy-nothingness of our days. It’s the time it takes, and the effort, that makes Geomancy a sacred act.
I fully believe that manually drawing a chart hundreds and hundreds of times is a special initiation into ‘geomancy’. By it’s little ‘tap tap tap’ of pen on paper, it sends echoes back across 1,000 years of history – countless people taking the time to ‘tap tap tap’ whilst contemplating their strife and troubles, or their wishes and desires.
That said, I know there are times when a long-drawn out ritual is a PITA. Times when, in a rush, you’d opt for a shower over an aromatic and fragrant feast-for-the-senses bath (with the full shebang of candles, crystals and bath bombs!). So yes, for these times there are automated options which speed up casting the chart.
In these situations, I recommend not skipping the process of generating the mothers manually. Whilst the realm of computer randomisation is still not great, it’s also because this part of the process makes ‘you’ the vehicle of divination. Let’s not delegate that to a machine quite so fast!
My favourite two options for digital geomancy are:
1. Phone and Tablet App: Simple Geomancy
App that’s available on phone. This app provides three options: shield and house chart (the traditional way), a ‘simple three-figure reading’ (providing a quick simple method of divination), and a single figure reading. When drawing a shield chart, it allows you to make your dots on the screen manually, four lines at a time (i.e. one mother). The figures are worked out, then the whole chart is drawn for you. You can then view the results in the shield chart, or two versions of the astrological ‘house’ chart (Traditional or Golden Dawn).
2. Website Application: Georatio.com
This is a website that provides both shield and house chart side by side, as well as many other calculations made when interpreting a chart (sum of the chart, viae, lots etc). The website is built on the premise that you have already cast your mother figures. You can then change the mothers to being the ones you have.
There is also the option of a ‘Novenary’ geomancy chart. This is a relatively modern innovation by Y. Lespar (2021, https://minorfracture.blog/).
Do I have to make dots to cast a geomancy chart?
Whilst laying down marks on a piece of paper is a traditional method of casting a geomancy chart, it is not the only option. You can use any method that will provide you with a binary (odd or even) result when casting the rows of the mother figures. Some modern suggestions for casting a chart are:
- Flipping a coin.
- Taking a random string of numbers from somewhere you can see when casting (note – there needs to be 16 numbers to do this in the most simple way)
- Using a deck of cards or tarot cards – either using the number as odd or even, or using whether the cards are black or red.
- A set of dice – some have a set of four platonic solid dice to represent each of the four elements of a figure. Each roll will then cast one figure.
- Picking up a random number of dried beans, stones, coins etc. from a full bag. See if each handful is odd or even, before proceeding to the next.
You may also use other traditional tools for casting the symbols:
- A tray of sand – making dots into the sand just as you would marks on a piece of paper.
- Ramal dice – these are a set of eight dice on two spindles (four to each spindle). When rolled they display all the mother figures. They’re quite handy to have!
- ‘Druid Sticks’ – these are modern in invention, and whilst I’ve not used them they look rather good. They are four two-sided ‘sticks’. Each side as one or two dots, so throwing four sticks gets you one one of the mother figures needed.
Can I use dice for Geomancy?
Yes, you can use dice for casting a geomancy chart. There are two types of ‘dice’ frequently used.
The first is a set of four dice, either standard 6-sided dice or a set of platonic solid dice (D4, D6, D8, D12). These are sometimes coloured to represent the four elements that make up a geomancy figure. Each die will give you an even or odd number, and therefore rolling four dice will glean one complete figure.
The second option is a set of Ramal ‘dice’, which are a specialist tool for geomancers used frequently in India and Iran.
What are Ramal Dice?
Ramal Dice (sometimes called Pase) are a traditional tool to cast the Mother figures of a geomancy chart. These consist of two spindles (fixed bars) with four spin-able dice on each spindle. Each of the four sides of a dice represents a possible half of a geomancy figure, e.g. Fire and Air lines, or Water and Earth lines. When both spindles are rolled and then placed together, the dice line up and present four complete figures (with one spindle becoming the lower half of the figures, and the other spindle becoming the upper parts of the figures). These are great, though getting a nice set can be tricky.
How long does it take to cast a geomancy chart?
Depending on experience and method used to cast the initial figures, a geomancy chart can take as little as 2-5 minutes.
Timing myself to draw a simple shield chart using Ramal dice to cast the mother figures (the fastest method), I completed a chart in 1m 14s. However, there are additional ‘calculations’ that can be made that will help in interpretation – including calculating the sum of a chart, the parts of spirit and fortune [LINK], looking at Via Puncti etc. This can take a while to ‘build’ a full shield chart to read. Additionally, if you prefer to read the House Chart then it will take some time putting the figures into this format (usually only takes a few more minutes).
I think the time taken to draw a simple chart is about the same as shuffling a tarot deck and laying a spread. That said, I find that interpretation of a geomancy chart can take a little longer than other methods to ‘start’. I spend a good few minutes reading the chart before I start talking through what I can see in the chart. Geomancy is definitely slower than other methods of divination, though for detail and accuracy it’s hard to find it’s parallel.
Are Western and Arabic Geomancy Shield Charts created differently?
No, the Geomantic Shield Chart is the same in both Western/European geomancy and Arabic geomancy. The interpretation methods used to extract information from the chart do have distinct differences, though share a ‘common thread’.
You may read that European geomancy and Arabic geomancy are very different from each other. When it comes to the Shield Chart, both traditions look very similar though they will use different methods of interpretation. Some methods are the same, though just interpreted differently (such as the use of Via Puncti). Where European and Arabic traditions do separate drastically is the House Chart – whilst this is used to provide a type of horary astrological reading in Europe, it is not used in traditional Arabic geomancy.
I have seen proclamations that Astrology was added to Geomancy after it came to Europe – that isn’t true. Astrology is a fully functioning part of Arabic Geomancy, though for Arabic practitioners the elemental attributions always proceed the astrological.
YouTube
Facebook
Patreon
Instagram